
Introduction[]
This is an exploration event with several stages of difficulty, completing them rewards you with a sword recipe, which can be crafted with materials obtained mostly from any exploration; Copper Ore, Lumber, etc. The highest reward, Shining Splendor, also requires event-only materials, Cavern Ore.
Guide[]
Sword crafting is done in multiple tiers. You can't simply craft the highest tier sword right away. To craft Shining Splendor, swords from previous tier, Superior Blade, are required, and so on. Note that Broadsword don't have to be crafted, they can be purchased for cheap in a couple of towns, including Town of Mitra.
Cavern Ore can only be obtained from the event in the PRO stage. It's important to farm enough Cavern Ore to craft however many Shining Splendor you are willing to make, as other material can be procured outside event and the crafting process can be done anytime.
Equipping Charm Bangle will reduce the amount of encounters and speed up explorations. Multiple instances of Reduce Encounter will stack, including one equipped by a friend unit.
Sword Crafting[]
- Broadsword can be purchased for cheap in a couple of towns, including Town of Mitra
- Lumber can be efficiently farmed in the BGN stage of this event
- You may also farm Lumber and Copper Ore on Earth Shrine - Exploration
| Item | Effect | Materials | Gil |
|---|---|---|---|
Fine Blade |
ATK+25 |
|
|
Superior Blade |
ATK+36 Effect: Blind (15%) |
|
|
Shining Splendor |
ATK+72, DEF+8 Effect: Blind (15%) |
|
Total cost for 1 Shining Splendor[]
| Materials |
|---|
|
Treasure Map & Battle Info[]
Dalnakya Cavern Harvest - BGN[]
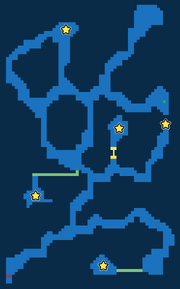
Treasure Map of Dalnakya Cavern Harvest BGN
| Energy | Battles | Gil | Unit Exp | Rank Exp | Clear Reward |
|---|---|---|---|---|---|
| 5 | ? | ~481 | ~4500 | 70 | |
| Possible Monsters | Possible Drops | ||||
| Abtu Black Widow Blue Wisp Goblin Green Slime Skeleton Steel Bat Wolf Mini Gil Snapper Metal Minituar |
Allure Powder Aqua Pearl Beast Meat Book of Ruin Broken Blade Chromatic Ooze Crimson Tear Esper Cryst Esper Shard Farplane Soul Gaia's Tear Golden Egg Green Fluid Life Orb Luminous Horn Pearl of Wisdom Quality Parts Rainbow Needle Raptor Feather Seed of Life Spellsilk Thickened Hide Mini Gil Snapper Metal Minituar | ||||
| Collection Points | |||||
| Lumber Copper Ore Ice Cryst Earth Cryst Water Cryst Light Cryst Magicite Shard Blue Magicite Potion | |||||
| Boss | |||||
| Goblin (4) Goblin Guard | |||||
Dalnakya Cavern Harvest - INT[]
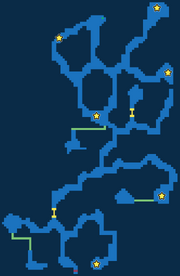
Treasure Map of Dalnakya Cavern Harvest INT
| Energy | Battles | Gil | Unit Exp | Rank Exp | Clear Reward |
|---|---|---|---|---|---|
| 10 | ? | ~395 | ~12450 | 75 | |
| Possible Monsters | Possible Drops | ||||
| Green Soul Wild Rat Yellow Jelly Zombie Metal Minituar Mini Gil Snapper |
Allure Powder Beast Meat Book of Ruin Chromatic Ooze Crimson Tear Dragon Heart Esper Cryst Esper Shard Gaia's Tear Green Fluid Life Orb Luminous Horn Quality Parts Seed of Life Thickened Hide Metal Minituar Mini Gil Snapper | ||||
| Collection Points | |||||
| Lumber Copper Ore Water Cryst Ice Cryst Earth Cryst Magicite Blue Magicite Potion | |||||
| Boss | |||||
| Chocobo Eater | |||||
Dalnakya Cavern Harvest - ADV[]
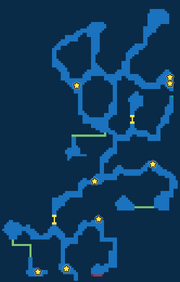
Treasure Map of Dalnakya Cavern Harvest ADV
| Energy | Battles | Gil | Unit Exp | Rank Exp | Clear Reward |
|---|---|---|---|---|---|
| 15 | ? | ~2166 | ~39998 | 80 | |
| Possible Monsters | Possible Drops | ||||
| Anet Barbarus Bomb Diresaur Hell's Rider Poison Bat Poplium Red Elemental Shadow Wyvern Metal Minituar Mini Gil Snapper |
Allure Powder Aqua Pearl Beast Meat Book of Ruin Broken Blade Chromatic Ooze Crimson Tear Demon Tail Dragon Fang Esper Cryst Esper Shard Farplane Soul Glowseeds Golden Egg Green Fluid Life Orb Litrock Luminous Horn Mystic Ore Pearl of Wisdom Rainbow Needle Seed of Life Thickened Hide Metal Minituar Mini Gil Snapper | ||||
| Collection Points | |||||
| Lumber Copper Ore Water Cryst Earth Cryst Magicite Blue Magicite Hi-Potion | |||||
| Boss | |||||
| (1) Wyvern (2) Hill Gigas | |||||
Dalnakya Cavern Harvest - PRO[]
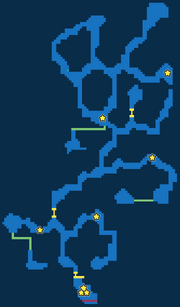
Treasure Map of Dalnakya Cavern Harvest PRO
| Energy | Battles | Gil | Unit Exp | Rank Exp | Clear Reward |
|---|---|---|---|---|---|
| 16 | ? | 5568 | 49298 | 100 | |
| Possible Monsters | Possible Drops | ||||
| Gloom Widow Goblin Goblin Guard Goblin Mage Poison Bat Steel Bat Metal Minituar Mini Gil Snapper |
Allure Powder Aqua Pearl Beast Meat Broken Blade Chromatic Ooze Crimson Tear Deepsea Bloom Dragon Heart Esper Cryst Esper Shard Esper's Tear Farplane Dew Farplane Soul Gaia's Tear Golden Egg Life Orb Luminous Horn Pearl of Wisdom Rainbow Needle Raptor Feather Spellsilk Wizard Stone Metal Minituar Mini Gil Snapper | ||||
| Collection Points | |||||
| Cavern Ore Mythril Ore Copper Ore Iron Ore Silver Ore Water Cryst Water Megacryst | |||||
| Boss | |||||
| (1) Amoebozoa (2) Hill Gigas (3) Ogre | |||||
Strategy[]
- Cavern Ore can only be collected on PRO, giving you an average of 12 ores per run
- PRO is vastly more difficult than ADV
- Many grouped enemies, AoE abilities like Bladeblitz are recommended
- There are 3 separate bosses with high defense and resistance
- Magic damage like Hyperdrive (FFVI) is more effective than physical damage like Barrage
- Their attack damage is not very high. Mitigate them with defense buff and attack debuff
- Break abilities do work on all bosses, but they might be resisted about half of the time
- Full Break counts as 4 separate breaks and may be resisted individually, but still highly recommended
- Third boss can paralyze and blind, take caution if you are using mostly physical damage
- MP restoration item such as Tent and Turbo Ether will be useful, you can use them in-between bosses
- You can conserve MP and speed up a run by using Escape on all normal enemies and equipping Charm Bangle
- Amoebozoa will use Osmose exactly after you use any spell. Thus you can either try and conserve MP by not using any spells, or you can beat him slowly with auto attack and at least one character using a spell.
Sample Party[]
| Role | Breaker | Healer | DPS 320+ ATK/MAG |
DPS 320+ ATK/MAG |
DPS 280+ ATK/MAG |
DPS 280+ ATK/MAG |
|---|---|---|---|---|---|---|
| Unit | ||||||
| Substitute |
Event Period[]
Event Period:
- Start: Monday 5/30/16 00:00 PST
- End: Friday 6/3/16 23:59 PST
Rerun Event Period:
- Start: Monday 6/20/16 00:00 PST
- End: Friday 6/24/16 23:59 PST
Rerun #2 Event Period:
- Start: Sunday 9/18/16 00:00 PST
- End: Thursday 9/22/16 23:59 PST
